Archives

Tight Hamstrings? Try This

I would think it’s fairly accurate to say that many people struggle with tight hamstrings (those are the muscles on the rear side of your leg near the top). There’s a well-known secret that I can’t even touch my toes! Sure, we can blame it on genetics (that’s what I like to do) and that may indeed be part of the problem, but the other part is lack of stretching. Can you remember the last time you stretched? If so, great! Was it a good enough time devoted to stretching each part of your body? Probably not, unless you took a yoga class not based on strength. 

People, if they don’t ignore stretching completely, will only stretch for a short period of time. Maybe a quick swing of the arms or a grasp towards the toes. People think it’s a waste of time and that if they’re working out, they should focus on calorie-burning or strength-building, none of this stretching nonsense. Well, guess what–it’s absolutely not a waste of time. Stretching, becoming limber, and flexible will help you in any sport, any exercise, any movement. Also, stretching shouldn’t be easy (you’ll see Hungry’s pained face below). Let’s start off with a deep hamstring stretch–all you need is a wall:

IMG_0063

spacer

Learning How to Stretch

Very recently, I’ve been getting lower back spasms. It doesn’t happen all the time, just sometimes at work when I’m sitting. It’s particularly worrying to me because those kind of things don’t really happen to me. Sure I’ll hurt myself doing something, but I don’t get chronic pain or ongoing behind-the-scenes stuff. Because it was so concerning to me, I wanted to get to the bottom of it immediately before anything got worse. So I got to thinking…what could of caused this? I looked up symptoms, treatments, causes…tight hamstrings, lack of strong core, poor posture. I then thought through my lifestyle lately, and realized I haven’t really stretched or done yoga in about 6 months. Yikes

IMG_2833

spacer

College Student Fitness and Nutrition Guide

We were recently contacted by an individual who asked us to take a look at a graphic and a link you will be later in this post. It is a somewhat long but simple and comprehensive guide to basic fitness and nutrition for college students and those who live a similar lifestyle. I read the post briefly and after realizing that there was nothing wrong or harmful in its contents I decided to share it. I think it is a very useful resource for students to print out and hang up in their rooms.

During our last leg workout, beasted calves hamstrings, and jump squats!

During our last leg workout, beasted calves hamstrings, and jump squats!

The credit for the post is given to the site which is linked below. I will keep the woman’s name who contacted us anonymous. Here is a Hungry&Fit generally-approved article and–more importantly–graphic that individuals can use as a basic guide for creating a great regimen for college fitness and a healthy lifestyle. (It doesn’t say much about nutrition and diet.)

As the page states, “Starting out at college is a time of excitement, anticipation, and oftentimes, extreme nervousness. There are a whole host of prospects that can leave any freshman filled with anxiety, from making friends to maintaining good grades to knowing which classes to take. One of the biggest sources of anxiety for students, however, is unrelated to academics: A large percentage of students greatly fear the famous and dreaded freshman 15. The truth is, this isn’t an irrational fear: Most college students will gain between 15 and 25 pounds by the end of their sophomore year. One of the main causes of the freshman 15? Lack of exercise: Not only do the majority of college students not get the recommended amount of exercise, one in three just don’t exercise at all. To be fair, finding time for exercise in the midst of busy college life can be challenging, but there are some great ways that that particular hurdle can be side-stepped. Today’s infographic takes a look at the best ways for college students to stay fit—even in the middle of a dorm room. From cardio to strength training to flexibility, there’s a myriad of ways in which even the biggest of couch potatoes can beat the freshman 15.”

http://www.thebestcolleges.org/the-best-regimen-for-college-fitness/

That is the image and below it is the link. Credit goes to TheBestColleges.org who we enjoyed working with and look forward to working with again in the future. They originally posted it in early August of 2013. Being hungry and fit is a lifestyle so creating a solid regimen is one of the best ways to stay hungry and fit!

You might also like…

BONUS KITTY PIC

Saturdays are obviously for family naps

Saturdays are obviously for family naps

spacer

6 Exercises You Should Be Doing Over 60

And even if you’re not over 60–these exercises help everyone. I work a lot with the older population and it’s never too early to make sure you age gracefully. Even as we get older, more stiff, and less agile, it’s still–no, MORE–important to exercise and keep active. The more we move, the better we feel.

The body strongly dislikes being inactive and has a way of turning on the body. Whether that means weight gain, arthritis, stiffness, and/or loss of flexibility. Just to name a few. Another big loss as we get older is balance. Falls are one of the biggest problems for seniors, and it’s never too early to start practicing. Try at least 3 of these each day:

1. Calf raises. Stand up straight. If you’re unsure of your balance, make sure you stand near something to hold onto (a chair, wall, anything sturdy). Rise forward onto your toes, leaving your heels off the ground. Slowly come down. Do 12 repetitions for 3 sets. 

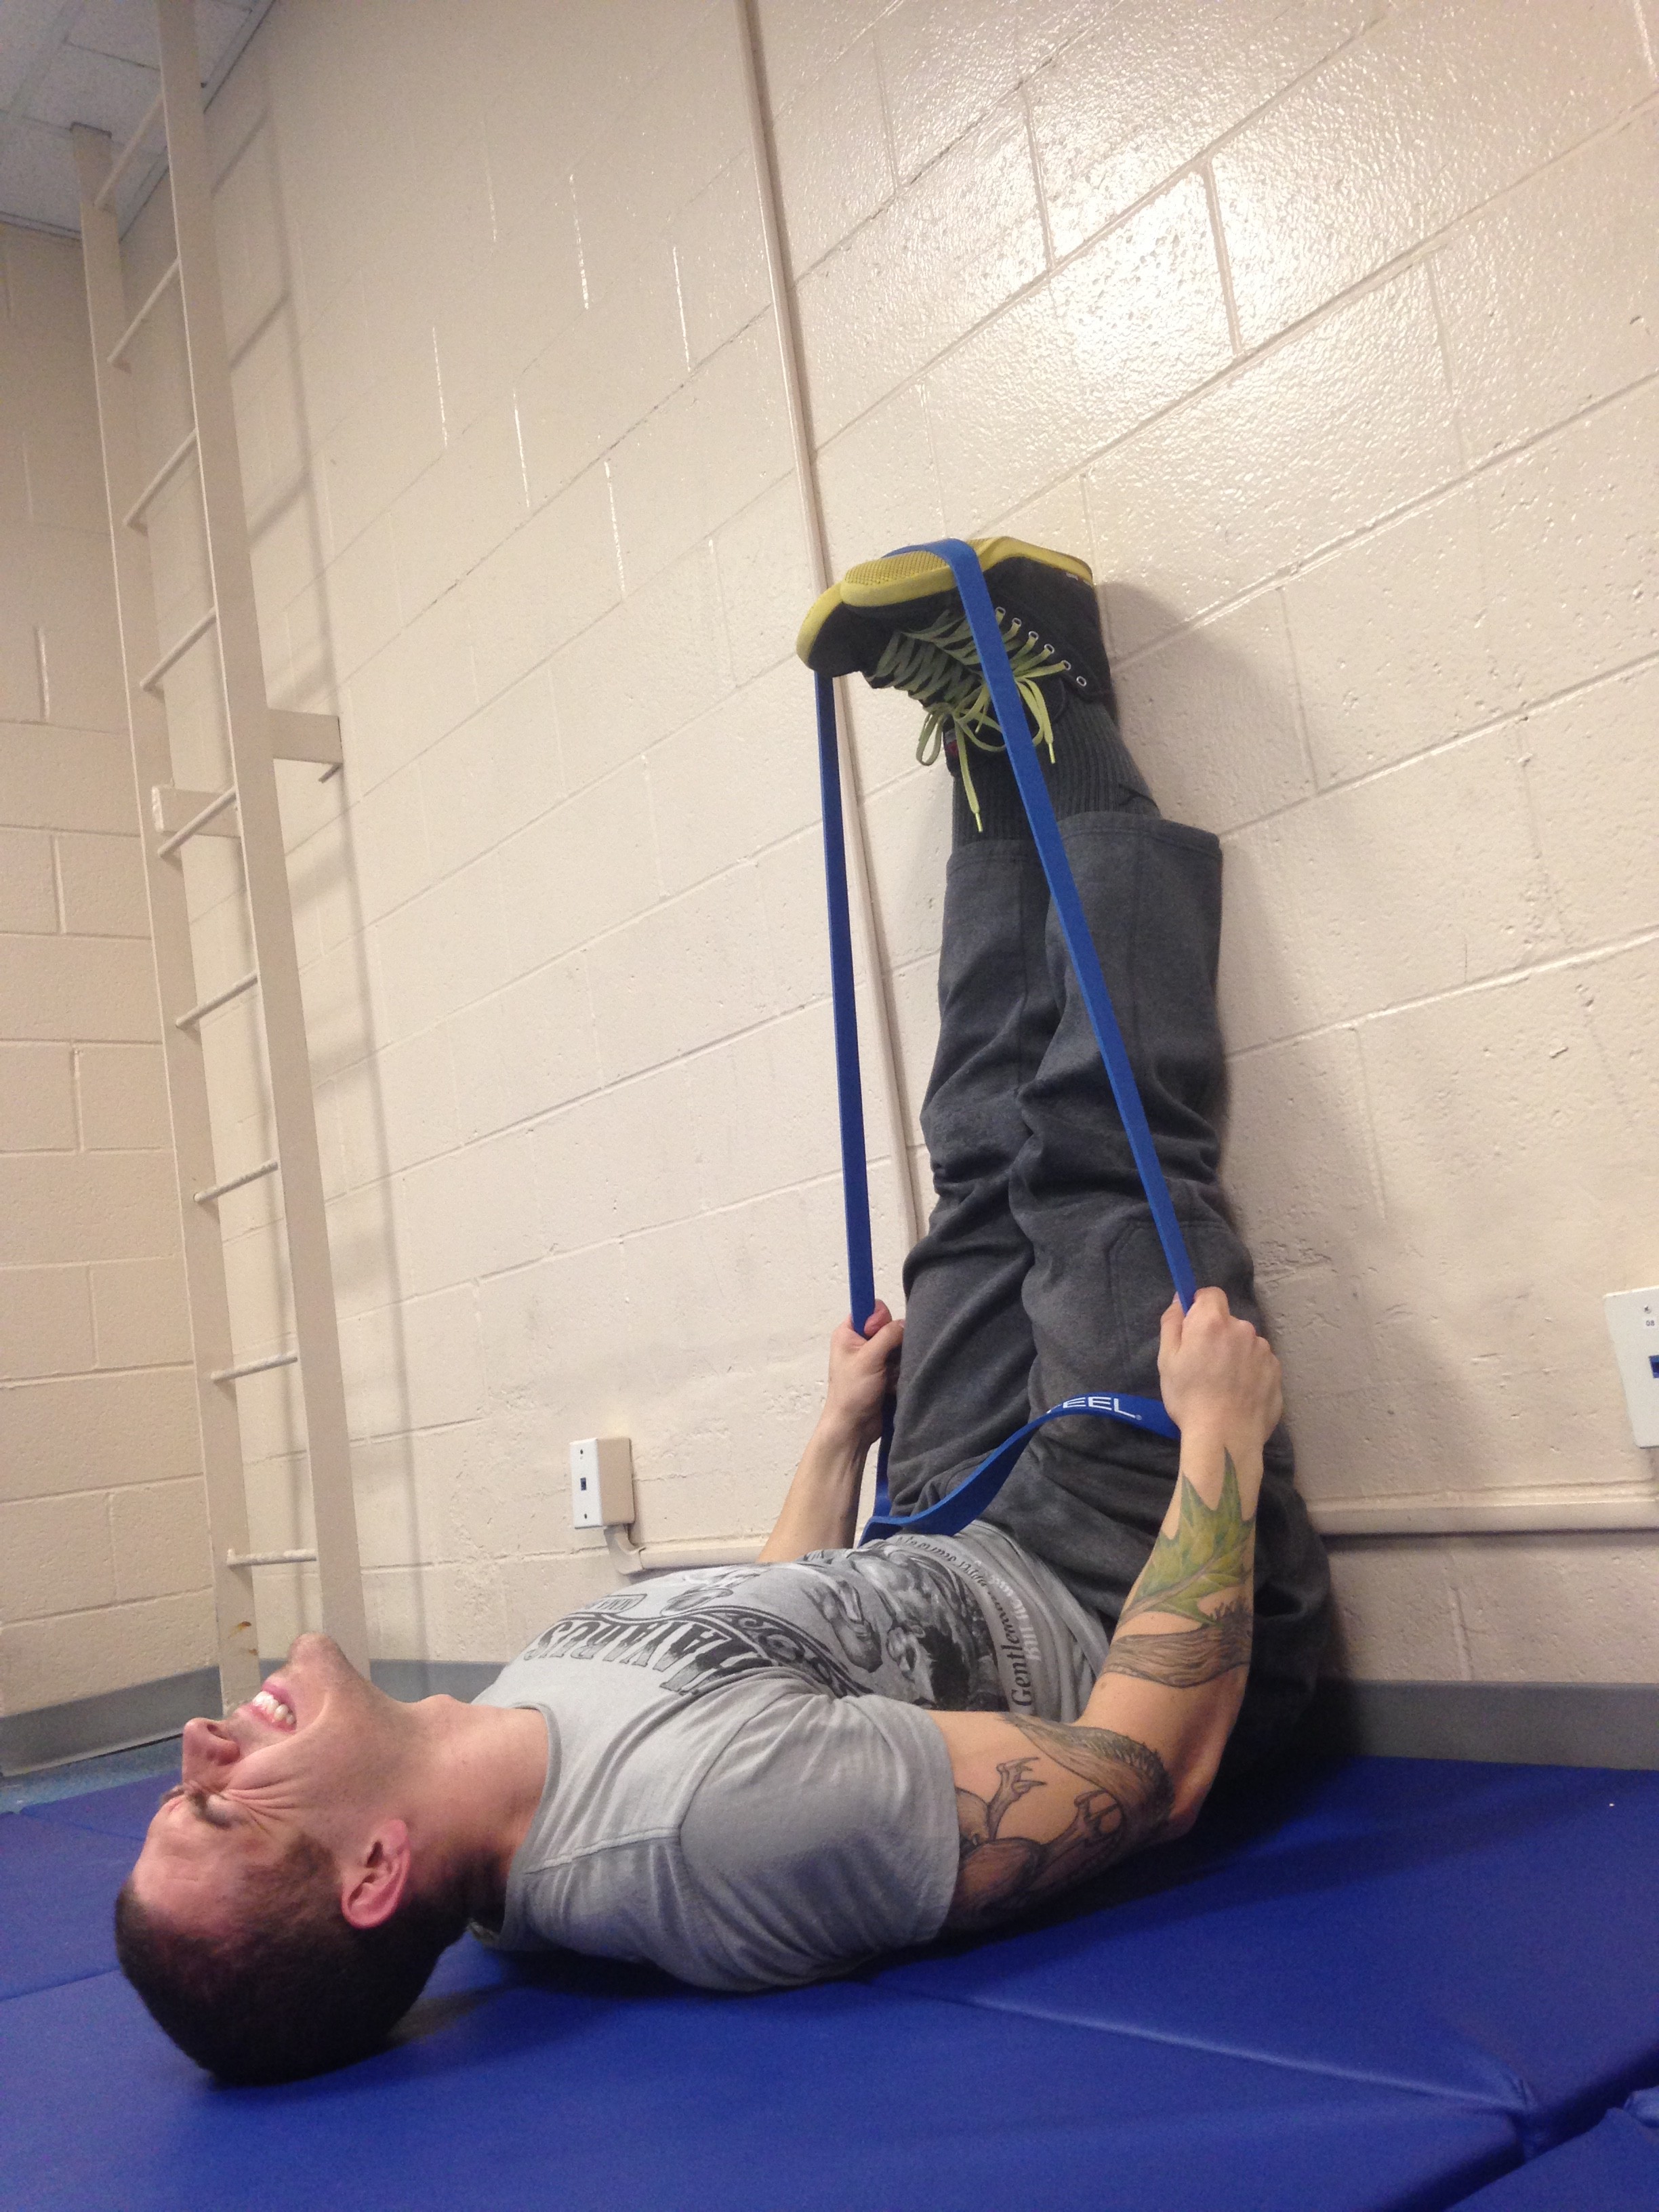
2. Rotator cuff stretch. This one requires a resistance band or tube. As we get older, we notice our shoulders deteriorating faster and getting injuries easier. Use this exercise to make sure you don’t hurt your rotator cuff. Tie the resistance band around a pole or bed post. Stand a few feet away and grab the other end. Rotate your elbow like a door hinge towards you and slowly back out. Control is the key here. Nice and slow, really use those muscles. Switch on other side. 12 repetitions for 3 sets.

rotatorcuffImage Source

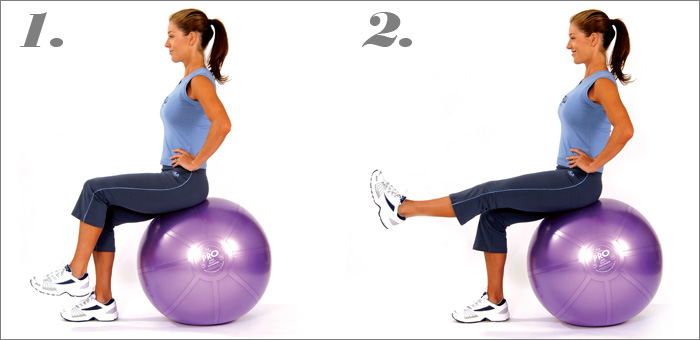
3. Single-leg balance. It’s as simple as it sounds. Make sure you have something nearby to hold onto and lift up one leg, so that you’re standing just on one. Hold it for 20 seconds. Switch. Do 2 sets.

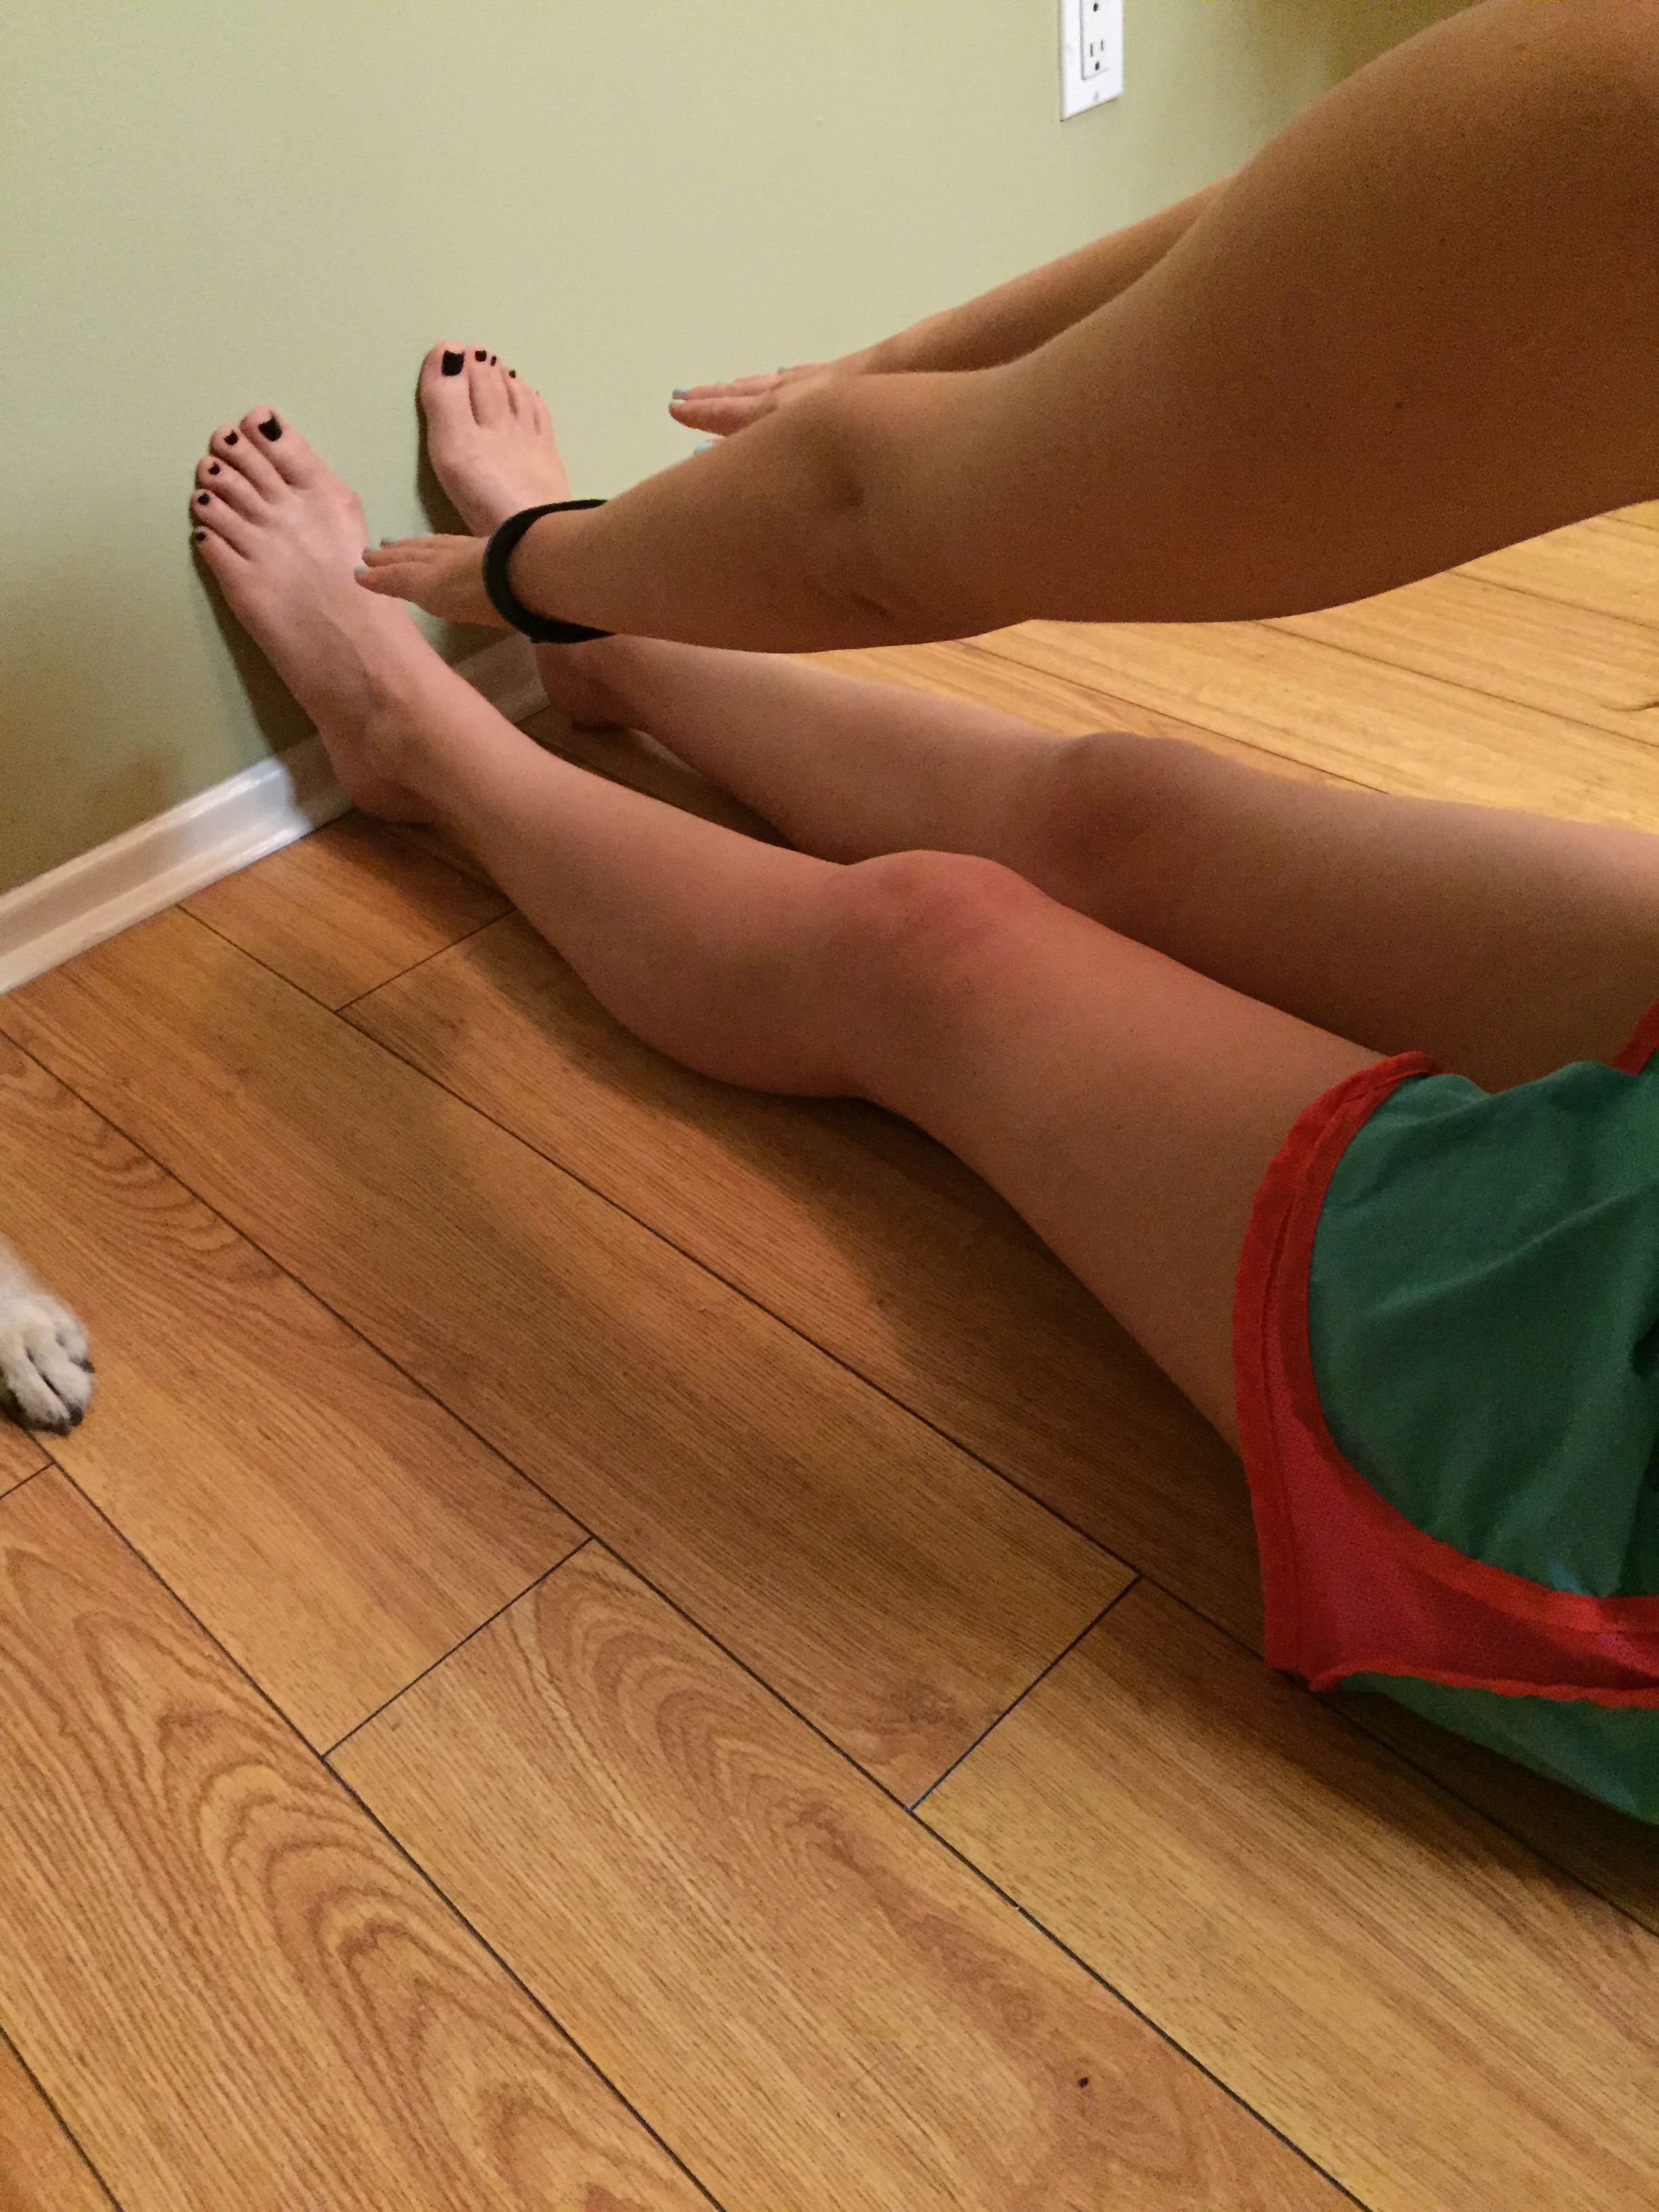
4. Laying twists. This is a great stretch for flexibility and stretching out your muscles–especially in your back. Start by laying down and spreading your arms into a T. Now drape your right leg over your left and look towards the right. You want to make sure your hips are twisting. If both shoulder blades are not on the ground, you’re moving your leg a little too far for your body. Hold for 10 seconds. Repeat on other side. Do 2 sets.

5. Opposite lifts. This is a core-strengthener. Lay down flat on a mat, arms by your side. Lift up the right arm and left leg at the same time. Now, you only want to lift the leg about 6 inches maximum from the ground. This is the point where your tummy really has to work to keep it up. Contract your abdominals. Lower both extremities, and perform on the other side. 12 repetitions for 3 sets. 

6. Cat/cow rotation. This is taken from yoga. Go onto all fours. When you inhale, lift your head up and invert your spine. When you exhale, move your head down and arch your back. Do about 10 rotations, 2 sets. 

Again, these are good for ANYONE. But especially if you’re over 60, put this into your routine. Either when you get up in the morning, during a commercial on TV, or before bed–make time for it. After all, it is your health. If you’re having trouble coming up with a routine and sticking to it, a personal trainer will probably be able to help. And we can always answer questions here.

Cheers! And as always…stay hungry and fit!

spacer

Starting a Balance Program: It’s Never Too Early!

Working at a YMCA, I work with an older population a lot of the time. This means lots of balance work. Using different exercises, different times, tempos, and so forth in order to prevent adaptation or plateauing. But the thing is, they seek me out because at their age, they have awful balance. However, if you start balance training earlier than later, you will be a happy camper. Proper balance training prevents falls and increases muscles endurance and strength in hips, buttocks, core, and small muscles of the feet. It’s time you started a balance routine today.

It doesn’t have to be a huge long thing. It could even be one balance exercise before your workout to start out. However, if you have the time, I would suggest doing a 20-minute balance routine 2-3x a week. At least!

Benefits of doing a Balance Training Program:

  • Better strength in smaller muscles
  • Stronger core
  • Reduced chance of falling and injury
  • Helps improve the connection between brain and muscles
  • Burns calories as your body struggles to stabilize

Yes, even my younger clients have complained of tiny muscles in the feet, or their hamstrings, or their hips being sore the next day due to efficient balance training. So now it’s time to start your own. Like I said earlier, at least do one balance exercise before your workouts, better to do more, if possible. Here is a list of great balance exercises to add to your routine:

  • Single-Leg Balance. This one is simple. Stand on one foot, posture straight, shoulders back. If you have poor balance or feel unsteady, have a wall nearby to hold onto when needed. 30 seconds each leg.
  • Single-Leg Balance, Eyes Closed. Same as above, but with the eyes closed. Closing the eyes throws the body off, makes it unsure of where it is. Thus, you get more wobbly. Working on this will improve your proprioception (aka, your body’s awareness of where you are even with eyes closed). 30 seconds each leg.
  • Airplane. Stand on one leg and lean your body forward, spreading your arms like wings of a plane. The goal is to get your body (torso) completely parallel to the ground, including the leg that is off the ground. This one is a killer for the glutes and hamstrings. 30 seconds each leg.

  • Heel to Toe [Drunk Walk]. Yes, it’s what you think it is. Imagine you get pulled over and a cop makes you walk in a straight line. I want your heel to touch your toe every time. Back and forth twice.

  • Windmill. Similar to the single-leg balance, but instead of keeping your arms still you are going to cycle them like a windmill. 30 seconds each leg.

  • Supine Leg Raise. For this one you need a foam roller. Place it along your spine, and far up enough that you can rest your head on it. You can touch your hands on the ground, but the goal is to do it with no hands. Slowly raise a leg up and lower it. Then alternate. 12 reps on either leg.

  • Single-Leg Rotation. Stand on one leg, raise the other so that your thigh is parallel to the ground. You can hold your arms out or put them on your hips. For me, it helps to hold them out. Now, slowly turn either to your left or right (depending what foot you’re on). Then come back. This is all on one leg. And you need to do it slowly. Control the muscles. 12 reps on both legs. 

  • Single-Leg Lift & Chop. Same position as the previous one. But this time I want you to lift your arms up and chop across the body, far down. Look at the picture, but without the medicine ball. It is important to not use your momentum. Use your muscles. Control. 12 reps on both legs. 

  • Seated to Standing. This one is simple. Without pushing your hands on your knees to get up, stand from a seated position. 12 reps. 

  • Stability Ball Leg Raise. Most gyms should have them. If you don’t have one, and don’t go to a gym, get one–it’s worth it. There are lots of exercises you can do with it. For this one, preferably with your hands up (you can hold your hips if you need extra stability), slowly raise your leg to full extension. Then slowly lower. Alternate. 12 reps on either side. 

  • Bosu Ball Stand. This one is simple, but there are many variations. Simply find a bosu ball, and stand upright. You may feel wobbly but attempt to stabilize yourself. If this is too easy, close your eyes. If this is still too easy, march your feet. 30 seconds. 

Remember, folks, you don’t have to do all of these. I’m giving you a big list so you can pick and choose, try new ones different days. And if you have poor balance or need more stability, do these with a wall, a rail, or a chair to hold on to. Safety first. Always. You are never to old to start balance training. There are so many benefits. It’s not a waste of time and it will save you big time in the future. Try it out.

Cheers!

spacer

How to Stay Loose and Fit During Travel

It’s the holiday season. Yes, it’s January, but plenty of people are still on vacation, currently making me jealous. However, with vacation, comes travel (usually). You gotta get from A to B to enjoy family or fun locations. That typically includes flying (as the most common), car, train, and/or bus. And usually, these take between 2-6 hours (domestically). Could even be more if you’re going out of country. That is a lot of sitting, laying, being crunched up in a seat that’s too small for you. I want to offer a few tricks to stay loose during travel, so you don’t exit the airplane or car swearing with uneven legs. So try these tips next time you fly, drive, or commit yourself to some type of travel:

1. Drink water. Now I’m guilty about this one. Usually, I take a window seat on the air plane–half for viewing pleasure, half for sleeping pleasure–and I try to avoid drinking water so I don’t have to ask everyone next to me to get up so I can go pee. Don’t follow my example. Get a cup of water (not Coke, not Vodka) every time the steward(ess) offers and even haggle them for more. This is going to keep your body flowing and running, rather than get cramped up and dry as would be normal in an airplane seat.

2. Get up and move. No matter how long the flight is, 1.5 hours or 7.5 hours, unbuckle your seatbelt and stand up. Find a quiet time when the stewardesses aren’t giving out drinks. You don’t even have to put your shoes on. Slowly walk down the aisle as far as you can and come back.

3. While you’re up… You got up. Congrats! Now once you’ve taken that lap or two down the very narrow aisle, stay up. Find a place where you won’t be bowled over–say, pretend you’re waiting for the bathroom. Now take a big stretch up, reach your arms high, and then swoop down to stretch to touch your toes–a hamstring stretch. Really reach down and enjoy this stretch. If you can, spread your legs out a little bit and reach to each side. This is really going to engage a large part of your legs, making you feel more refreshed and vitalized. Go ahead and throw a quadriceps stretch in there, and pull your ankle back to your hamstring.

4. Don’t forget your arms! Since you’re up and you stretched out your legs, you might as well give your arms some love too. This is all to wake up the blood flow and keep your body from stiffening up too much. Grab your elbow and pull it across your body, giving the shoulders and arm a good stretch. Don’t forget the other side. Now pull your elbow up and back, focusing primarily on the triceps, but will get your shoulders too.

5. Stretches while seated. So you stood up and got some good stretches in, or maybe you didn’t have the chance at all (because you’re in a car)–here’s where seated loosening comes in. Sit up straight and place your hand on the side of the head and pull it gently towards the shoulder, giving your neck a beautiful stretch. Go the other way. Now bow your head, then rotate it back and look at the top of the plane. Do this several times. Now, without bothering your seat buddies, roll the shoulders back and forward–do this for at least 20 seconds.

6. Keep your shoes off! You may feel embarrassed about this, but a great way to stay loose and comfortable is to take those pesky shoes off. It will allow your feet to breathe and be flexible. It will also allow you to do foot exercises: (1) scrunch your toes up as if you are picking up marbles and (2) bend your foot left and right.

Those are just a few tips and tricks to save you during travel times. I would say do this set of stretches and instructions once every three hours in order to preserve freshness! Happy travelling!