Usually when non-fitness people (whatever that means) hear the word “push-up,” they cringe in fear and run away. So stop! Don’t run! The push-up is a wonderful exercise for strengthening your body and you can literally do it almost everywhere. You don’t need any fancy equipment or gym, you don’t even need a proper ground–you could do it in the mud, if you preferred.
However, when people bravely attempt the push-up, their form is often wrong. Not only will this not give you the proper exercise, you can injure yourself if not positioned properly. So let’s get through this and do it the right way. There are various forms of the push-up, but I’m showing you the basic push-up.
Alright, find yourself an area on the ground where you have room to fully extend. Start on your hands and knees and face the floor. Extend your legs, your toes/top of the foot should be the floor. Now, have your hands shoulder-width apart (or a little bit wider). It’s a good thing to stack your shoulders right above your elbows and wrists. This ensures joint and bone stability, so that nothing simply gives out. So now you’re in the starting position!
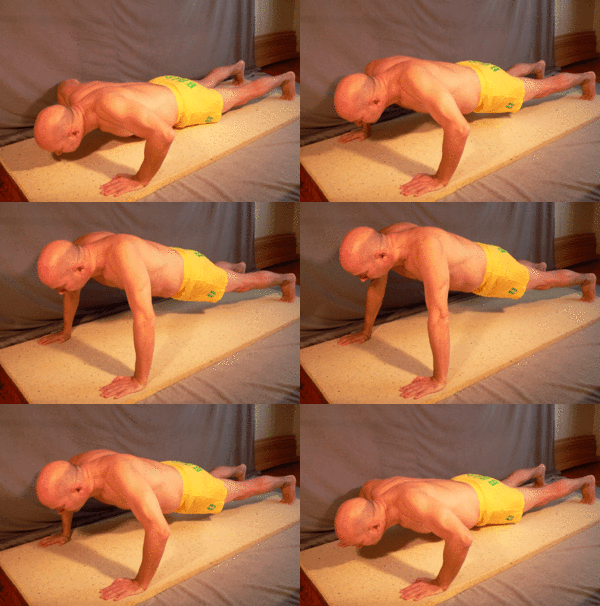
I can’t describe how extremely important it is to have your body rigid like a plank. I don’t want to see your hips drooping or raising above the rest of your body. It should be a direct line–think graphs. If it’s not, you’re doing it wrong and if you continue to do so, it’s going to throw your body out of whack.
Now it’s time to try the actual exercise of lowering yourself as close to the ground as possible. Keep your elbows in as you slowly, keeping the hips in line with the body, lower yourself to the ground (without actually hitting it). Check your form out–is your body a straight line still? What about your neck? So often, people think they’re doing the push-up properly, and you see their neck drooping. Just because your neck can hit near the ground, doesn’t mean you’re doing it properly. So as your whole body is coming down, make sure your neck and head stay aligned with your body. It’s extremely important for the exercise and the health of your body.
Now the tough part is coming back up. Keeping your form pristine (see above), use your chest muscles to push yourself up to starting position. This means your head and hips are still aligned with your torso and legs. And there you go. Congrats. Do 4 sets of as many as you can do. It will be extremely difficult at first, but the more you do them, the stronger your chest and arms will get. And ladies, I want to see you doing these too! It’s important to build our upper body. I do them, so can you.

Deutsch: Liegestützender Mann in gelben Shorts. Animiert. Verzögerung 0,2 s (Photo credit: Wikipedia)
Now there is a variation of the push-up for those who need it:
Knee push-ups. These are for those who are too weak and need more practice for the regular push-up. On this one, instead of resting on your toes, rest on your knees. Even though you are on your knees and hands, you still need to extend your body so that it is like a straight line and you are bring your torso down, not just your head or your shoulders.

Keep it up and work on those pecs! You will get to the regular push-up, and once you do, keep good form and get strong! Hey, maybe even make it a Resolution to get to a certain # by each month. Good luck!
Cheers!


